Friday, January 30, 2015

Lovely Lilac and Gold Tattoo Manicure

Ok, so this was a weird experiment, but I had to try it. I wasn't planning on adding the gold glitter polish tips, but when I applied top coat to the gold tattoo on my fingernail it made the color from the tattoo bleed! I was just dying to try out the metallic tattoos somehow.


I heard about other top coats that don't smudge like the Sally Hansen Insta-Dri that I'm using. I will have to check them out.

Ugh, and my glitter tips are so sloppy, but the baby was awake and I had ZERO time to think. I can touch up the tips later.

I got the metallic tattoos from Walmart in the jewelry department. I would wear them on my body, but it's not like I ever go anywhere! Maybe I'll save some for spring and summer.


Here's the colors I used. They are "Lacquered Lilacs" and "Studette" by Pure Ice. I love both of these polishes, but I especially love the lilac color. It's great after two coats and a nice shiny top coat. It really doesn't NEED any nail art at all.


So that's my crazy experiment. I learned a lesson or two, and will try again another time, Now I need to go touch up my tips...


Tuesday, January 27, 2015

Long Distance Love Valentine's Day Manicure

I had this crazy idea to do a design that represents my love life, and this is pretty much spot on. It was harder than I expected. It's a little messy. Do you see what I did there? Are we talking about the manicure or my love life?

I tried out my new brushes for the first time, and learned a few things right off the bat. I need lots of practice. It was pretty fun, though, and I'm looking forward to using them more.

So here it is...my little tribute to what we have...


The tiny hearts on pointer and pinky finger were easy. I used a small dotting tool and a safety pin to create the points. The bigger hearts were a pain in the...heart. There has got to be a better way, but I don't know what it is yet.


So that's it. Let me know what you think in the comment section below!

Red Valentine's Day Manicure w/Engangement Stone Accent

This is the first of a series of Valentine's Day manicures that I would like to accomplish. I was just in the mood for red and sparkly, but then my nail art tape showed up in my mailbox, so I had to test it out!

I used a couple fun colors. The base color is "Smokin Hot" by E.L.F. and the sparkly topper is "Hit the Floor" by Pure Ice. I love both colors! On my shorter nails, I could suffice with just one good coat of the "Smokin Hot". The Glitter coat was a bit tricky to apply evenly on all fingers, but totally worth the work.


I think this turned out really pretty.


In hindsight, I realize I could have done a horizontal stripe on my ring finger to make an engagement ring. I think I will do it on another manicure. Actually, I'm looking forward to it!

The nail art tape is so fun to work with. There is a trick to it. If you leave it too long (hanging off the edges) you run the risk of it peeling up even if you have applied top coat. So I am trying to remember to cut it a little shorter. I also apply a good, thick coat of top coat.


 This tape has a neat holographic pixelated pattern on it. It's just one of thirty colors for me to play with.

So that's it for now, but soon I will have more Valentine's Day looks to share with you. I hope you enjoy!


Saturday, January 24, 2015

Pretty Pure Ice "Splash!" and "Poppin Bottles"

Just a simple manicure today. I cut my nails down and wanted something that makes short nails still look sweet. It feels very delicate on my fingers. It's shimmery and fun. Pure Ice "Splash!" is a great color for winter, spring or summer. I felt the manicure was a bit simple without an accent nail, so I just added a layer of Pure Ice "Poppin Bottles" to both ring fingers. I'm very happy with the outcome.


If you don't own these colors yet, I think they are worth adding to your collection. I think they are very shimmery and fun, and will definitely attract compliments. I'm very happy with this brand because it is so affordable and their shimmery colors are delicious!

I hope you enjoy!

Friday, January 16, 2015

Super Sexy SinfulColors...Sugar Sugar.

This is one of my all time favorite red colors EVAR. I can't stop looking at my hands. Seriously, for such an affordable brand, this polish has exceeded my expectations. SinfulColors run about $2 per bottle. The formula is great, making for a smooth application and easy touch ups if you make a goof or two. I thought the dry time was perfect, making it possible for this busy mom of a baby to easily apply two coats for perfection. Although I am totally into nail art right now, I refuse to put anything on top of this color. It makes such a beautiful statement on it's own.


Enough talk, here's SinfulColors' Sugar Sugar...


This is one of those colors that screams "Date night!" or "Where's my negligee?"

It's the perfect color for Valentines Day.

So what I'm saying is don't miss out on this color!

Let me know what you think about this color in the comment section. I would love to hear what you think about it.

Monday, January 12, 2015

Pink and Aqua Manicure

I must admit that I love how this turned out. It's so very feminine. I am calling it my "Barbie Manicure." It took me all day to do this, due to the fact that I have a five month old who loves to be snuggled.

I started out with one coat of pink, but quickly realized it would take many coats to get full coverage. So I quickly slapped on one really thick coat of the pink, and topped it off with another thick coat. It was a difficult polish to work with.

The colors I used are: Wet n Wild Wildshine "Tickled Pink" and Sally Hansen Hard as Nails "Celeb City."


I was trying to come up with something creative to do with the "pink and aqua" prompt, even trying swatches of several aqua polishes on paper. I wanted to do aqua roses with delicate green foliage in a pretty floral pattern on one nail, the rest accented with my new silver glitter polish. Or perhaps, aqua candy cane stripes with silver glitter accents.

Nope. "Ain't nobody got time for that." At least not me, anyway.

At 9pm this Mama was tired, and sick of trying to make the decision. So I grabbed my favorite silver polish and the dotting tools. I made one silver dot close to the base of each nail (with the intention to make more dots), but quickly realized that it was a crappy choice to do dotting with! The dots came out uneven. No biggy, I'm a sucker for rhinestones and I happened to have some little aqua rhinestones on hand. I plopped them in the dots before they dried and covered everything with a thick layer of fast drying top coat.


I've found that sometimes the most simple manicures give the biggest impact. When you focus more on the color, or a simple accent, that's what makes it really stand out.

Oh, and of course I have to mention my new, totally amazing engagement ring. Squeeeeee! How could I forget!

Tuesday, January 6, 2015

31 Day Challenge, Day 6 "Half and Half...Metallic Leopard and Zebra Print

This turned out SO BEAUTIFUL! I can't believe I actually pulled this off in the first try. Wow. This is most definitely my favorite manicure since I started this nail art project less than a month ago.

I watched a few YouTube videos to get the hang of the lines and spots. You really don't know what you're doing until you dive into it, though.

Here's the finished product. What do you think?


I hope you enjoy it as much as I do. I'm looking forward to doing this with many different colors in the future!

31 Day Challenge, Day 5 "Dotting Tools" Salmon with Black Dots

Just a very simple design with the dotting tools. My six year old daughter picked the base color. It's a weird color! It's a polish I picked up at Forever 21, and their polish doesn't seem to have names.

Honestly, I wanted to do something way more awesome, but I was in such a hurry again. I was lucky to get this done before the baby woke up. I wanted to add black decals, but I don't have any.

*le sigh*

The good thing is I am on schedule for the 31 day challenge.


Hmmmm, well that's it for now. I have a "half and half" mani to get done for today's challenge.

Bye for now!

Monday, January 5, 2015

31 Day Challenge, Day 1 "Follow a Tutorial"...Salt Manicure!

I LOVE watching this lady's YouTube videos. She makes things so simple. When I saw this I was like "Nuh-uh!!!" It's seriously cool. When I saw the "follow a tutorial" prompt I thought about this technique, but ended up looking for something more elaborate...just to go running back to this one. I HEART RealAsianBeauty! I'm totally a subscriber.


It was so easy!

Materials I used:

Base coat
Top coat
Nail polish
Table salt
Plate
Spoon
Paint brush
Acetone
Cup
Stiff make-up brush


1. Apply a base coat.
2. Once dry, apply a coat of polish.
3. While the polish is still wet, sprinkle salt all over your nail, making sure to cover every spot.
4. Press salt gently onto nail .
5. Let dry for a couple minutes.
6. Use paint brush to brush off any extra salt around nails
5. Apply fast drying top coat.
6. Use stiff make-up brush and acetone to remove any extra top coat that might have spilled over your cuticles.

...aaaaand DONE!


I plan on trying a lot of colors with this technique, but from what I've heard, light colors look best.

I hope you enjoy this post, and hey...why not give it a shot yourself?


Sunday, January 4, 2015

31 Day Challenge, Day 4 "Happiness" ...Is the Night Sky

I managed to get this done while the baby was playing with his toys. Damn I'm getting fast! It's also my second blog post today!

Today's prompt was "Happiness", and one thing that makes me really happy is watching the moon and twinkling stars. I'm looking forward to my love coming back so I can watch them with him.

I didn't mean to add so much glitter to this design. I wanted to add it to the moon after I painted it on, but found out the base coat was still tacky and the glitter stuck to it. Ha! Oh well, the more twinkles the better.


So everything is glittery over here right now.


It's a bit of a rushed manicure, taking about 20 minutes to complete (not including top coat drying time). maybe in the future I can do those super fancy, time consuming, perfectionist manicures, but for now...this is what you get.

Ta-ta for now...

31 Day Challenge, Day 3 "Water Spotting" Hot Pink = Summertime in Winter! (with instructions)

Here's my experience...

At first water spotting was pure hell! It took me about three hours to figure it out (with breaks because the baby was awake for part of the time...so more like six hours!) I tried using using two kinds of body spray and one hair shine spray to see what kind of product made the best "spots" in the top color. Your best bet? Rubbing alcohol. I just emptied out a small spray bottle and filled it with rubbing alcohol.

I practiced on my non-dominant hand with a pearly magenta base color. I tried five different top colors on five different fingers. I actually tried about 15-20 polishes, but some didn't spread on the water or the colors were not bold enough. I learned that the more contrast the better.

So I decided to try a white base. Yes, I cleaned up the edges with a make-up brush and acetone.


Then I got lucky and tried a really fun color, which is Pink Cream by Sinful Colors. It has a little bit of a pearl effect which looked pretty on top of he water.


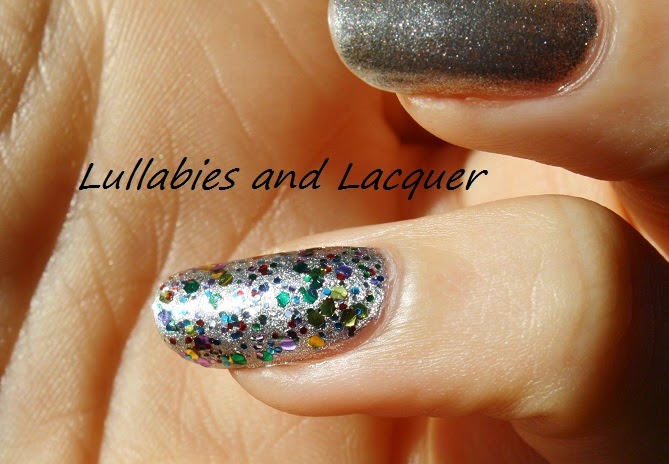
I finally found the perfect materials and colors, and once that was done I thoroughly enjoyed the water spotting technique! I added a rhinestone to my ring finger (which I've come to realize is sort of my signature), slapped on a fast drying top coat and was very pleased with this vibrant manicure!


Here's the colors and some additional products I used to make things go a little smoother:
Base color - Sinful colors - Snow Me White
Top color - Sinful colors - Pink Cream
Base coat - Sally Hansen double duty base and top coat
Top coat - Sally Hansen Insta-Dri
Filtered water
Small bowl
Orange manicure stick
Isopropyl alcohol
Small spray bottle
Petroleum jelly
Wide paint brush
Baby wipes
Acetone
Elf make-up brush
Clear rhinestone
Nail glue


The Process

1. Use a small bowl, not too wide, and fill it with room temperature filtered water
2. Choose your colors and make sure your top color spreads on the water
3. Paint the petroleum jelly around your nail, up your front and back of finger and under your nail if you have long nails
3. Drop your top color into the water and watch it spread. I used about 6-8 drops per finger.
4. Hold the spray bottle back a bit, spray on top of the polish, watch the little bubbles form
5. Choose the spot that you like best, and dip your finger in at a 45 degree angle, nail facing down, keep finger in the water.
6. Blow on the nail polish floating in the bowl to dry it, then clean it out of the bowl with the orange manicure stick.
7. Once all the nail polish is removed from the water, pull your finger out.
8. Use baby wipe to clean up the nail polish and petroleum jelly that is on your finger.
9. Repeat these steps on all fingers.
10. Use a stiff (eye liner/shadow) make-up brush dipped in acetone to clean up and remaining polish on your cuticles or fingers.
11. Apply any appliques you may want to use.
12. Apply top coat.


That's how I did it and it worked great.


There it is, and now I kinda wish I was at the beach sipping on a fruity drink...and the kids were with a babysitter. A girl can dream, right?

I hope you enjoy, and if you have any questions about this manicure shoot me a comment down below. I'd love to hear from you!

Friday, January 2, 2015

31 Day Challenge, Day 2 "Tape Mani" ...Mint and Lilac Manicure

I joined Debbie Crumpets Crumpet's Nail Tarts 31 Day Challenge. I'm absolutely nuts, but I will try my hardest to complete it! Because we all know I have plenty of time for that. *insert sarcasm here*

My first mani of the challenge actually fits into three different categories, so I need to figure out which one I want to squeeze it into.

~Follow a tutorial
~Tape mani
~Dotting

I'm not completely happy with how it turned out. My dotting kinda sucks. My first dotticure was amazing. This one? Not so much.

So here's what I came up with


MAJOR DOTTING FAIL!

Yeah, my dotting sucks so bad. I don't know what happened.

...but I love this feminine color combo so much.


Here's the materials I used:

Base color - Pure Ice, Home Run
Dot color - Pure Ice, Lacquered Lilacs
Stripe color - Salon Perfect nail art striper - Silver plated
Dotting tool by Cina
Painter's tape 
Scissors


Well, I'm reaching for the acetone and ready to strip this off and start planning my next design. Wish me luck...

Thursday, January 1, 2015

My Unfinished New Year's Nails

Well, I had good intentions, but quickly started to realize that maybe, just maybe...I had other priorities. As the title of this blog implies, I am a mom. As I come into this nail art journey and the New Year, I realize even more than before how this new year is dedicated to my children first...my aspirations second. I have a feeling this will not be my only unfinished manicure this year!

Even though I wasn't able to finish, and the base color started to chip before I even got to the top coat slapped on, I still love looking down at this sparkly wonder.

I was planning on adding different shapes and colors of rhinestones to every finger except my ring fingers which are accented with the glitter polish. Then I would have finished it off with a shiny top coat.

This is how it all went down...

The day after Christmas I went to the mall with my children. I spent some time in Forever 21 looking at all the cute clothes, feeling a bit jealous of all the girls who can wear such cute things. Me? Yeah, I'm still nursing a baby and have to have easy access to my boobs...so I had to walk past all those cute things.

Anyway, at Forever 21 I found an awesome rainbow glitter polish and glow in the dark polish. Honestly, the girl at the check out counter was so rude to me, that I just put them back and walked out of the store. I was mad and I wanted to cry. I just wanted to find something that I could use to make myself feel beautiful. That flew right out the window. I just didn't need that kind of treatment.

The next day I picked up a gift pack of four Elf nail polishes at Walmart after Christmas sale, and I must admit that the glitter polish was the main reason. I paid about $2.50 for the set.

So here's my failed attempt at my New Year's manicure...


The glitter polish accent nails are the only ones that got a top coat.


I'm a happy girl because I got four new polishes to add to my collection which includes this little gem.


The base color is a beautiful silver. It's Sally Hansen's Hard as Nails Xtreme Wear, color Celeb City. I love this silver. It dried wonderfully, and was flashy and fun.


Anywho, the past few days have been so busy. I guess I'm lucky I got this far. I will try harder to finish my designs in the future, but I can't promise anything at the moment! I have to just go with it.

So far this is my favorite manicure (even though it's unfinished) since I started this journey last month.

Happy New Year to anyone who actually reads this. It's a new year and a new start. I'm ready to embrace it!